This post contains affiliate links.
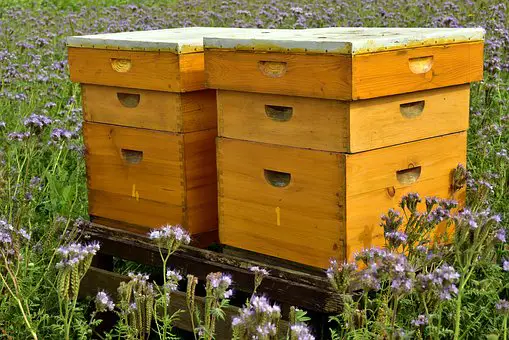
This article is about the protocol for erecting a Langstroth hive once the manufacturer’s pieces have been put together with nails, screws and glue. It explains the individual components, their function, and its location on the multi-story hive.
If you are not handy with tools, consider purchasing from a vendor that markets Langstroth hives with components already assembled.
What are the steps for erecting my new Langstroth beehive?
- Place the bottom board on the hive stand.
- Place a brood box on the bottom board.
- Place frames in the brood box.
- Place Queen excluder on top of the brood box.
- Place super on top of the brood box.
- Place inner cover on top of super.
- Place lid on
inner cover. - Add entrance reducer.
Eight steps of hive set-up: From the bottom board up:
The first piece of the hive to be placed on the hive stand is the bottom board.
1. Bottom Board
A bottom board is a board with three sides slightly elevated with spacer boards known as rams. This leaves a open entrance for the bees to enter and leave the hive. The bottom board sits directly on the hive support base. The first brood box with frames will sit on top of the bottom board rams.
A bottom board can be a screened bottom board or a solid bottom board.
Screened Bottom Board
Screened bottom boards gives the hive much needed ventilation and are quite useful in identify activity within the hive, both normal and abnormal.
Placing a sticky white corrugated foam board insert under a screen bottom board gives the beekeeper the opportunity is look at the insert and observe the droppings that have fallen through the screened bottom board and stuck to the insert.
Some beekeepers prefer to purchase non-sticky inserts and turn the insert sticky by adding their “sticky” of choice.
Screened bottom boards with white corrugated foam board are usually included when purchasing a Langstroth hive.
Things that can be identified on the white corrugated foam board include:
- Remnants of chewed through birth cell caps. This can help the beekeeper identify the interior frame, and even the position on the frame of the new brood, that new bees are emerging from their birth cells.
- Varroa mites can show up here as well if the hive has a Varroa mite problem.
- Hive beetles can show up on this board as well.
- And you may well see ants on the insert.
Solid bottom boards are used when trying to keep the hive warm during the cold months of the year. Some say using solid bottom boards in the spring helps the hive stay warmer and encourages foraging bee to start there work earlier in the year than hives with screened bottom boards.
Now that the foundation of the hive is placed on the hive stand, the second component to add is the brood box, the first story of the beehive.
2. Brood Box
A Langstroth brood box is typically a “Deep Box”, meaning it is full size of 19 ⅞ inches in length, 16 ¼ inches wide, 9 ⅝ inches high and contains 10 frames.
As the hive becomes stronger, a second brood box should be added to prevent overcrowding and swarming. Some beekeepers add a third brood box to a strong hive because a strong hive can overcrowd even two brood boxes, but this requires using a special technique called “checkerboarding”.
Learn more about “checkerboarding” and swarm prevention…..
The next component added to the beehive are frames for the brood box.
3. Frames
Frames are the heart of all bee activity. Frames are where honey bees raise their young.
Frames are also where all raw material, the nectar and the pollen, are initially deposited by the foraging bees. From the initial deposit cell, worker bees begin to work the raw materials into “bee bread” as they move the raw material around into mixing cells to make bee bread to feed the larva.
Nectar is also deposited into frame cells where the bees begin their processing techniques to produce honey from the nectar.
There are a few decisions to be made before choosing frames for the beehive.
The first frame decision to make is:
- Deep frames
- Medium frames
- Shallow frames
The choice of frames chosen dictates the size of the hive box being added to the beehive structure.
Deep hive frames are big frames that fit into a deep hive box. They are designed to fit a hive box that is the standard size of 19 ⅞ inches long, 16 ¼ inches wide and 9 ⅝ inches in height. Deep frames are 9 ⅛ inch in height.
The first two hive boxes are usually deep hive boxes and are designated by the beekeeper to be brood boxes. This is where the Queen bee will be laying eggs to build up the workforce of bees needed in a healthy hive. Overcrowding in this area will result in the Queen, about half the hive, and a lot of the honey leave the hive in a swarm.
Learn more about swarming here…..
When honey bees “built-out” the frames in a deep hive box, it will weigh 75 to 100 pounds and can be difficult for the beekeeper to lift.
The weight variance (70 to 100 lbs) is dependant on the density of the stored honey. The more water the bees can extract from the nectar, the heavier the honey will weigh, therefore, each honey frame in a typical ten frame super will weigh between 7 and 10 pounds.
Beekeepers generally
Supers are designed to be hive boxes from which honey can be extracted for human consumption. Hive boxes designed to rear new bees is a brood box and any honey in a brood box is there to feed the bees and larva.
A gallon of honey weighs about 12 pounds on average, therefore, one could expect to get about ¾ of a gallon of honey from each deep box frame added as a honey super.
Medium sized hive supers will weigh about 40 to 50 pounds when full.
The height of the medium
Shallow hive supers can weigh up to 40 pounds. Appropriate sized 5 ⅜ inches in height frames will be used in this shallow super.
The second frame factor to decide is the type of foundation inserts will be in these frames:
- Plastic foundation inserts
- Plastic foundation coated in beeswax
- All
beeswax foundation - No foundation
- Wired or no wires
Plastic foundation frame inserts:
The plastic inserts are certainly the most inexpensive option of insert selection but some beekeeper will not use plastic because of a concern of the toxins contained in the plastic. That is an individualized choice for each beekeeper to make.
Simple plastic foundation frame inserts are plastic sheets molded with raised surfaces in the shape of a honeycomb. It merely provides a pattern upon which bees will deposit wax that forms the honeycomb.
One downside of the simple plastic foundation frame insert is the amount of work that is required of the bees to lay down the initial coat of wax needed to cover the plastic insert before they start building out the honeycomb structure.
Plastic foundation frame inserts coated in beeswax:
The plastic foundation frame inserts coated in beeswax is the same simple plastic frame foundation insert with the exception that it has been dipped in melted honey bee wax.
This pre-dipped in beeswax frame foundation insert gives the hive’s worker bees a HUGE head start on building new honeycomb. Beeswax is a precious commodity to worker honey bees. There are only a few-days-window in a honey bees life cycle when they can produce beeswax. Beeswax is a substance that is secreted by the honeybees body for a few day during their entire lifecycle.
All wax foundation frame inserts:
All wax foundation frame inserts are made entirely of beeswax by pouring melted beeswax into a silicone mold and waiting for it to solidify. These inserts are much more fragile than the plastic frames and must be handled very carefully, especially in cold weather when they are very vulnerable to cracking and breaking.
The “all natural” beekeeper will be much more likely to use this “all wax foundation” than a plastic foundation.
No Foundation:
Some beekeepers favor using no foundation insert. They simple take an empty frame and attach some cut comb to the top bar to get the bees started but allow the bees to be their own structural engineers from that point forward.
While this is certainly the way honey bees build honeycomb in a wild hive, it also brings a problem known as “burr comb” of “cross-comb”.
Burr comb is the honeycomb bees tend to build between the different frames within the super thereby attaching each frame to the other frames in the super. This presents the big problem of removing each individual frame from the super for inspection without destroying other frames honeycomb.
Wired or no wires:
And then the final selection of using foundation fame insert that use wire supports within the foundation.
Wires add additional support to handle the heavy weight of the honey so it makes sense that the bigger the frame the more wired foundation will help. This is certainly true for the deep honey supers that will be added to the hive for honey harvest. They will be entirely honey filled.
Medium and shallow honey supers are less likely to need additional support.
The wired foundation inserts can be a problem when it comes time to harvest the honey, especially if the beekeeper wishes to extract large intact sections of capped honeycomb which is considered by many to be the preferred harvest method. The wires will forch the beekeeper to harvest capped honeycomb in mich smaller sizes.
Frame Design For Different Types Of Foundations:
Frames come in different styles to accommodate the type of foundation insert that will be used in that frame. Some frames come with a wedged top bar in the frame and some frames come with a grove in the top bar. These different top bar designs are to accomodate a specific foundation insert. Best advice: purchase the foundation inserts from the same vendor of the frames and ask them for the correct top bar configuration for the type of foundation that is being purchased.
Frame Foundation Color:
Frame foundation inserts come in two colors: white and black.
Black foundation inserts are used by some beekeepers in the brood boxes to be better able to see the tiny white eggs laid by the Queen bee.
Now that the brood box(es) are all set up, most beekeeper anticipating harvesting honey will want to keep the Queen from laying eggs in the designated honey “supers”. To exclude the Queen from these higher stories on the hive, they use a Queen excluder.
The next item to add to the beehive construction is the Queen excluder which lays directly on the top of the highest brood box in the hive.
4. Queen Excluder
There are three primary types of Queen excluders:
- Queen excluders made entirely of metal.
- Queen excluders using a metal screen but housed within a wood frame.
- Queen excluder made entirely of plastic.
Whether to use a Queen excluder or not is a topic that deserves its own article and is not discussed here.
Learn more about whether to use a Queen excluder or not…..
On top of the Queen excluder the beekeeper will add a “honey super”. Be sure the hive is remaining level as you add height with these honey supers. Remember, each story of the beehive weighs between 70 and 100 pounds so a hive with two brood boxes and one full honey super can weigh in excess of 300 pounds.
5. Honey Super Box
Above the Queen excluder the beekeeper will add “honey super(s)”.
These honey supers are where the bees will deposit only gathered nectar and process that nectar into pure honey.
They will not deposit gathered pollen in these supers. Pollen is only used in the brood boxes for the purpose of raising more bees so they will always deposit the gathered pollen near the birthing cells, and the Queen can not lay eggs in the honey super because the Queen excluder prevents her from entering the honey super.
Supers come in different sizes, including the same size as a brood box, however, because of their height on the hive and the weight of the super, many beekeepers elect to use smaller size supers just to make it easier for them to lift. A deep honey super can weigh up to 100 pounds.
The next component to be added to the hive tower is the inner cover. On top of the highest honey super a wooden intercover will be added to the hive construction.
6. Wooden Inner Cover
An inter cover is kind of like a bottom board except it has “rams” on all four sides of the board with a small entrance notch facing the front of the hive. The small notch in the forward facing ram is referred to as the “top entrance”.
In the center of the inner cover board is a circular hole allowing the bees to descend into the hive. Most foraging bees will prefer this entrance because it is a more direct route to the honey super frames and they don’t have to fight their way through the mass of non foraging bees in the brood box or the Queen excluder.
During periods of time when the beekeeper needs to feed the bees, this hole in the inner cover becomes the receptacle for an upside down Mason jar full of sugar water to feed the bees.
Finally the hive construction is topped off with an outer cover lid.
7. Outer Cover Lid
The hive is topped off with a cover lid. The cover lid is slightly longer and wider than the inner cover board with downward pointing rams. This space between the outer cover lid and the wooden inner cover gives the bees enough room to access the upper entrance notch.
The outer cover lid is covered with weather resistant material, much like a roof on a house, to keep the rain and moisture out of the hive.
Now the hive is ready for the last piece of construction, the entrance reducer.
8. Entrance Reducer
An entrance reducer is a beveled piece of wood the same size as the lower beehive entrance that slides into the lower entrance of the hive. The entrance reducer has a notch cut into the reducer. The notch is were the bees will now enter the beehive at the bottom entrance.
The entrance reducer makes the entrance much easier for the “guard” bees to protect the hive from other bees that may try to steal the hive’s honey store. It also helps keep out other pests such as mice.
In the winter, entrance reducers help retain the hives interior temperature.
And voila, you have a hive. Now all you need are bees.
Happy Beekeeping
Paying It Forward
Backyard Visitors participates in affiliate programs which compensate us for referring traffic.