This post contains affiliate links.
Discover how to build a kid-friendly chicken coop with DIY chicken coop plans. Follow our step-by-step guide to create a safe, engaging coop for your chickens, perfect for family fun and fresh eggs.
Whether you are a seasoned backyard chicken aficionado or a beginner eager to share the joys of raising chickens with your children, be sure you choose DIY chicken coop plans that are designed to help you create a safe, engaging, and productive environment for your feathered friends. Follow along as we explore creative and practical ideas to build the perfect coop for both chickens and children alike.
Introduction to Building a Kid-Friendly Chicken Coop
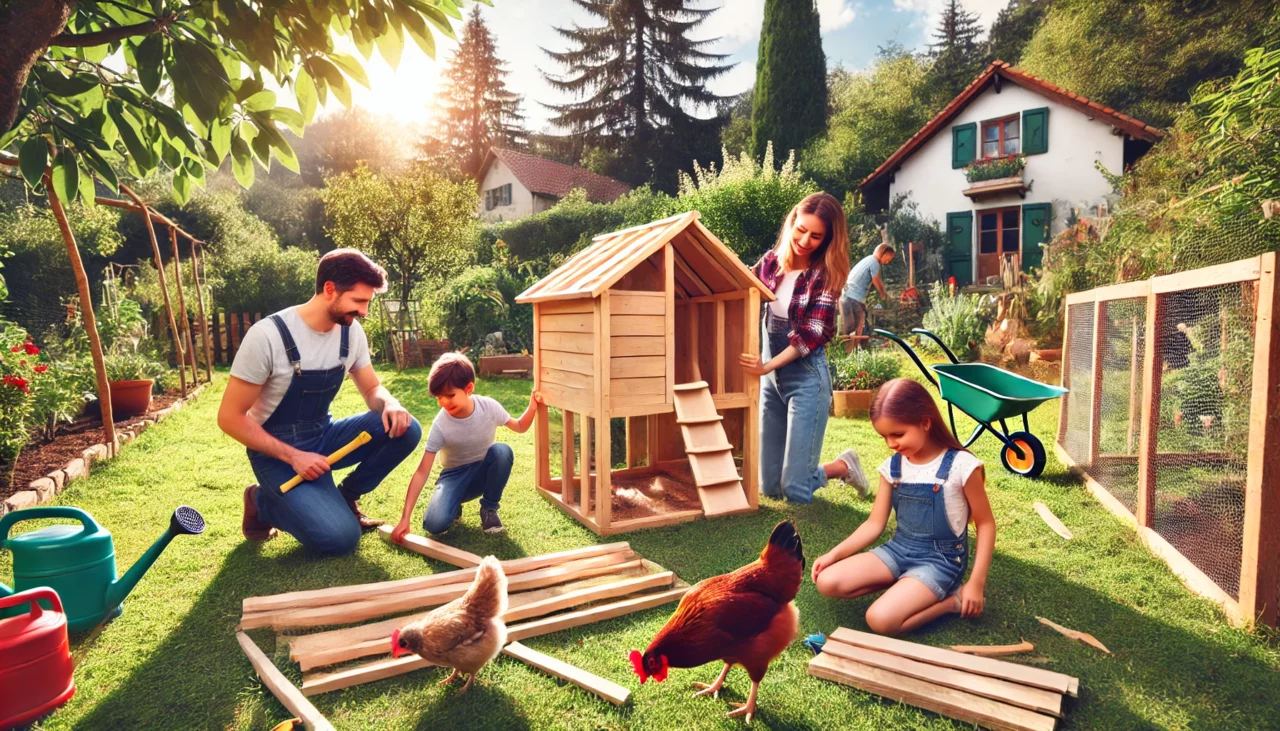
Welcome to my ultimate guide on building a child-friendly chicken coop! If you are considering creating a space where your children will learn about raising chickens, then you are in the right place.
A DIY chicken coop can be a fantastic addition to your backyard, making it a family project that everyone will enjoy. When building a coop, there are several things to keep in mind.
You will want to create a safe and inviting environment for your chickens, while also making sure it is accessible and fun for the children. Ensuring a friendly and safe environment means considering every detail down to the coop’s size.
A small chicken coop can be beneficial for tight backyards but remember that even small chicken coops need enough space for chickens to move around comfortably. First, start by understanding the requirements for your DIY chicken coop. This includes everything from materials to tools and specific design features that are safe for both children and chickens.
The next step is to plan and design your coop. Thoughtful planning means making sure everything goes smoothly, and your coop ends up being both functional and aesthetically pleasing. Creating a child-friendly chicken coop is both building a structure and making a space where children will interact safely and learn about caring for chickens.
In this guide, I will cover all the essential steps, from planning and constructing the chicken house to adding nesting boxes and finishing the interior. Ultimately, the goal is to design a coop that is friendly for your chickens and educational for your children, offering a safe zone for both. Stay tuned as we dive deep into each step of creating the perfect DIY chicken coop for your family!
Read my other related articles:
- Backyard Chickens and Children: A Guide to Raising Chickens as a Family Project
- Benefits of Raising Chickens for children: Responsibilities and Learning
- Safe Interaction Between Children and Chickens
- Fun and Educational Chicken-Related Activities for Families
- Choosing the Right Chicken Breeds for Families with Children
- Lessons in Sustainability and Nature for Kids Through Chicken Keeping
- Sharing the Backyard Chicken Keeping Journey
Step 1: Understanding DIY Chicken Coop Requirements
When embarking on your journey to build a child-friendly chicken coop, it is crucial to understand the fundamental requirements before diving into the construction process. First and foremost it is paramount to select diy chicken coop plans that cater to both your child’s and the chickens’ needs. The coop plans should be easy to follow and designed to ensure safety and functionality.
There are a plethora of DIY chicken coop building designs for sale on Esty. Shop the site with your children to come up with a design that everyone agrees on, whether you purchase a DIY design or decide to draw your own plans. Involve your children from the very beginning.
Considerations For Building A DIY Chicken Coop
- Consider the size of the chicken house to ensure ample space for the chickens to move around comfortably and maintain their well-being.
- A solid coop frame is vital, as it provides the structural integrity needed to withstand various weather conditions and protect the chickens from predators.
- A well-thought-out plan will include provisions for a movable or portable coop, ideal for both backyard accessibility and to provide fresh ground for the chickens.
- Incorporate ergonomic aspects for children, such as installing lower-height perches and easy-to-access doors, to enhance their interaction with the chickens.
- Proper ventilation is another critical element to ensure the coop remains dry to reduce the risk of respiratory issues among your flock.
- Consider a nesting box configuration that is simple yet effective. The nesting boxes must be accessible for egg collection while it provides sufficient privacy for the hens.
- Use sturdy materials such as chicken wire to help fortify the walls of the coop. This prevents predators from gaining entry.
- Movable parts and features allow flexibility for maintenance and cleaning, making the coop more manageable in the long run.
By carefully selecting and implementing well-devised DIY chicken coops, you will create a safe and engaging environment where both your children and chickens will thrive. As you delve further into the project, remember that comprehensive planning is key to building a successful and child-friendly chicken coop.
Step 2: Planning and Designing Your Coop Plans
When building a child-friendly chicken coop, the planning and designing phase is crucial. Your coop plan should factor in the number of chickens you want to keep and their needs.
A general rule of thumb is to allow for at least 2-3 square feet per chicken inside the coop and 8-10 square feet in the run area. This is the governmental minimal recommendation for commercial egg producers.
For an egg producer to advertise their eggs as “free range”, the minimum square foot per chicken is four square feet.
When starting with your DIY chicken coop, it is essential to draft a detailed design. Sketch out the dimensions of your coop, indicating where you will place key features such as roosting bars, nesting boxes, and ventilation.
Consider the shape and layout of your chicken coop for chickens to make it easy for children to interact with the flock and help with maintenance.
A well-thought-out design will also take into account factors such as sunlight exposure, predator protection, and weather-resistance.
Many families opt for a design that echoes elements of their home, creating a familiar environment for the new feathered residents.
There are plenty of free and paid coop plans available online that address styles and functionalities. Whether you are handy with tools or just beginning your DIY journey, select a detailed plan to simplify the construction process.
Remember to check local zoning laws and homeowner association rules to ensure your planning and building efforts go smoothly.
Keep the excitement of creating alive by involving your children in the planning stage, discussing the coop plans, and letting them add their ideas to the design. Take the time to measure twice and cut once, ensuring the integrity and longevity of your new chicken home. Detail in the planning phase will ensure your DIY chicken coop becomes a safe and fun space for your chickens, making it well worth the effort you put in now.
Factors to Consider in Your Chicken Coop Plans
When diving into DIY chicken coop plans, it is crucial to consider several factors to ensure a safe, functional, and child-friendly environment for your chickens. To start, you will need a solid basis, so think about the floor of the coop.
A raised floor made of sturdy wood will keep your coop dry and free from pests.
The downside to a wooden floor is cleaning the floor of chicken poop and preventing it from becoming wet from rain. Many coop builds recommend using hardware cloth as a floor base instead of wood, thereby preventing the complications of manure and water.
Your coop frame also needs to be robust, providing a stable structure to withstand various weather conditions. Cedar is the best choice.
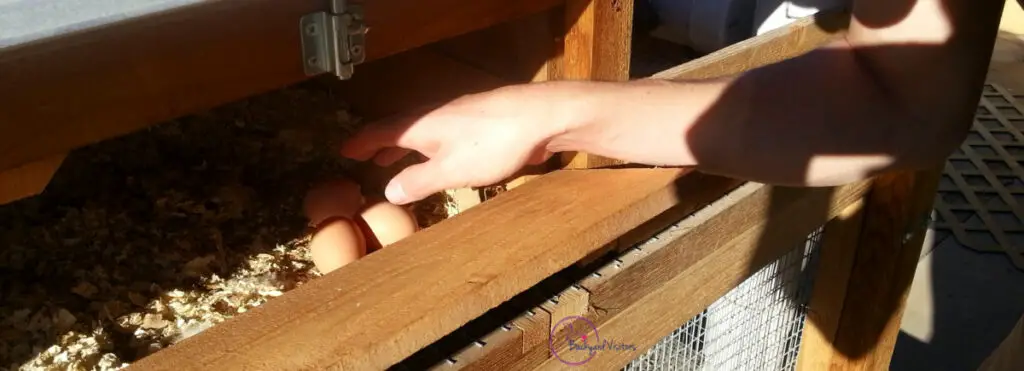
Another vital element in your DIY chicken coop plan is the nesting box. Chickens need a comfortable and secure place to lay their eggs, and having enough nesting boxes is essential to reduce competition and stress among your birds. Ensure each box is approximately a foot square and placed at a lower height for easy access by little hands when collecting eggs.
Also, consider the run attached to your coop. The run is where chickens will spend a lot of their time, so it should be spacious and secure.
My chicken run is excessive. It is 8’ x 40’ for my five birds, giving them 64 square feet for each chicken. The floor is the earth, and I have included a dirt bath and different perching height opportunities with hay bales and dead tree limbs. They love their run!
For a child-friendly setup, make sure the run is easily accessible so children enjoy watching the chickens safely.
Moreover, proper ventilation is crucial for your coop. Ventilation ensures fresh air circulates inside, reducing moisture and ammonia levels, which is healthier for both chickens and children. Install screened windows or vents on opposite sides of the coop to maintain good airflow.
Also, using hardware cloth instead of wood for the coop floor makes for much better ventilation.
Remember, chickens tolerate sub-zero temperatures much better than the heat. At 100 degrees Fahrenheit, your chickens will be struggling with the heat. Ventilation and shade help them a lot!
Finally, do not overlook the placement of your coop in the backyard. Choose a place that gets some shade to keep the chickens cool and select a location convenient for children to reach but safe from backyard hazards.
Collecting data before the DIY build through observing your backyard’s conditions will help make informed decisions in your DIY chicken coop plans. This ensures that your chickens thrive while your children enjoy their new feathered friends.
Step 3: Raising and Constructing the Chicken House
After carefully planning, it is time to bring your coop plans to life by raising and constructing the chicken house. Building the chicken house involves several critical steps, from setting up the coop frame to ensuring proper support for the entire structure.
Start with sturdy wood to build the framework for your DIY chicken coops. Have a solid coop frame to provide longevity and stability. Cedar is your best bet for coop longevity and weather resistance.
My coop, although pre-fabricated and only requiring assembly, is entirely cedar.
It holds up well to weather and time!
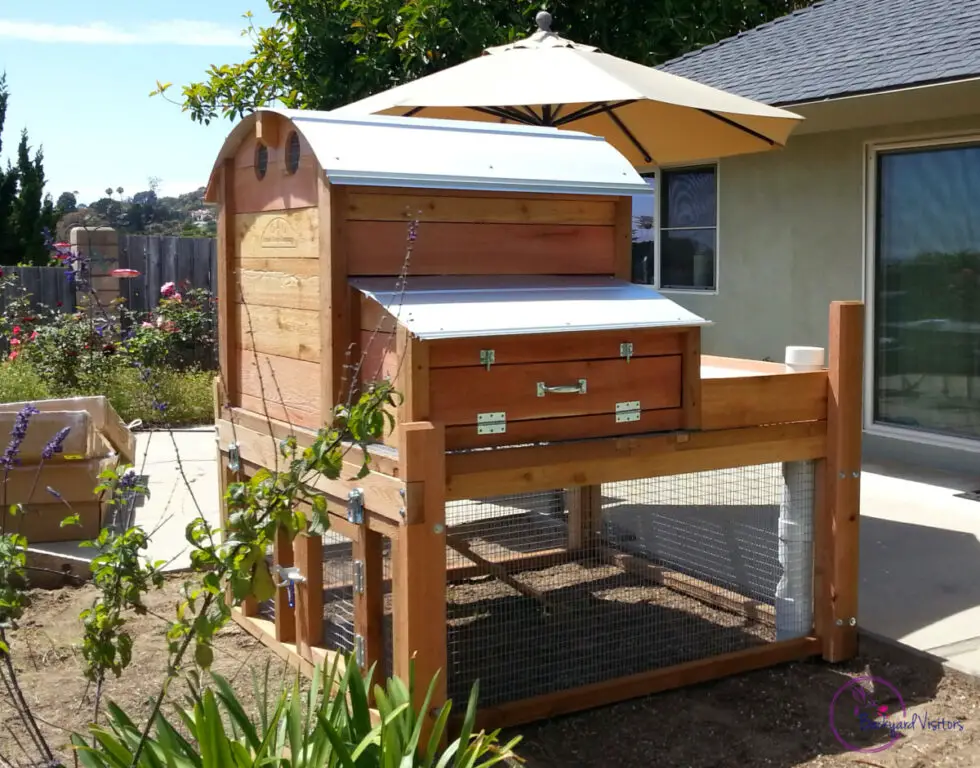
Note the boxes it came in on the left of the picture.
Consult various DIY chicken coop plans and tailor them to fit your backyard space and needs. Once your basic structure is up, it is time to add the walls using more wood or other suitable materials you can easily find at your local store.
The outer walls form the first line of defense against predators and the elements, so they need to be well-secured.
When constructing the run, attach it securely to the main chicken coop. This outdoor section will provide your chickens with ample space to move around during the day. Ensure it has sturdy fencing material to keep your chickens safe from predators.
Your coop should also have adequate ventilation, so consider cutting out spaces for windows, which I will cover in detail in the upcoming steps.
Pay special attention when building the nest boxes inside the chicken house. These boxes provide a dedicated space for your chickens to lay eggs and rest comfortably. Nesting boxes should be easily accessible and well-padded to keep the eggs safe from breaking.
As you raise the framework and build the structure, always keep safety and accessibility in mind to make it a friendly place for both your chickens and any children who will be helping out around the coop.
Step 4: Installing Doors and Windows in the Coop
As you continue with the construction of your chicken coop, it is time to focus on installing doors and windows, a crucial step in your DIY project. Properly placed doors ensure easy access to the coop for both you and your chickens. It allows for convenient cleaning, feeding, and egg collection, especially when your small chicken family grows.
Consider placing the main door in a location that offers easy entry without disturbing the nesting box areas.
Windows, on the other hand, are essential for ventilation and natural light. Proper airflow helps keep the smell manageable and provides fresh air for your chickens, which is vital for their health.
When selecting windows, consider installing them higher up in the coop to allow air circulation but prevent drafts directly on the chickens.
Do not forget that windows should also have sturdy screens to keep predators out while letting air in. While building your chicken coop, you will want to ensure that the doors and windows are sturdy and predator-proof.
Using materials such as heavy-duty wire mesh (hardware cloth) and solid wood frames adds extra security.
During the coop frame assembly, mark where your doors and windows will go to avoid any construction mishaps. If your coop has separate sections, consider an additional door for the nesting box area, making it easier for your children to gather eggs.
Pay attention to these details in your DIY chicken coop plans, focusing on creating a space that is accessible and safe for both your children and the chickens. Thoughtfully installed doors and windows, gets you one step closer to a family-friendly, functional coop.
Step 5: Adding Nesting Boxes to Your Chicken Coop
Step 5 in creating a child-friendly chicken coop involves adding the much-needed nesting box for your chickens. A well-designed nesting box is essential for the comfort and productivity of your chickens and also offers a great learning opportunity for your family’s DIY projects.
Building a DIY chicken coop that is both functional and easy for children to maintain is a rewarding experience. When crafting the nesting boxes, ensure that they are at a comfortable height for both your chickens and your children who will be collecting the eggs.
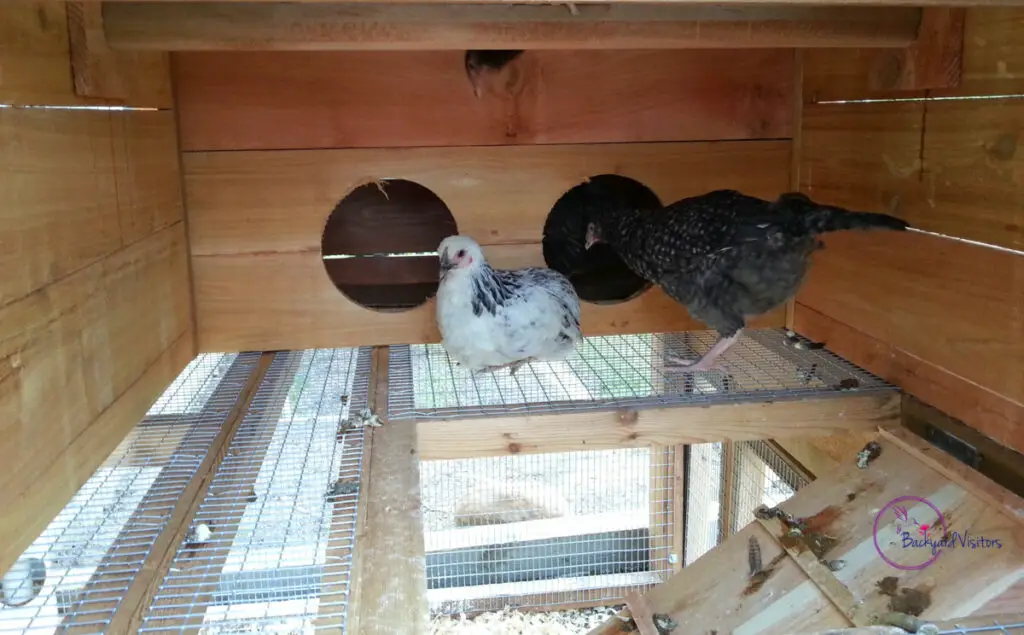
Typically, a nesting box should be approximately a foot square, providing enough space for one or two chickens. You will find that hens prefer a cozy, dimly-lit box, which encourages them to lay their eggs. Therefore, your chicken coop should be designed to keep the nesting boxes somewhat shaded and private, enhancing your hens’ comfort.
The number of chicken nesting boxes will typically depend on the number of chickens you are housing in your coop. A general rule of thumb is one nesting box for every three to four hens.
When building your DIY chicken coop, consider easy access for egg collection – either from inside the coop or through an external door. This makes the chore of collecting eggs fun and straightforward for the children. This fosters a family bonding activity while it ensures that your home enjoys a regular supply of fresh eggs.
Adding nesting boxes is a pivotal step in your DIY chicken coop plans, contributing significantly to a well-organized and productive coop environment. Remember, a happy hen lays more eggs, making your nesting boxes an integral component in achieving a successful home coop setup.
These thoughtful additions transform your coop from a simple shelter into a productive, child-friendly space.
Step 6: Finishing the Interior of the Coop for Chickens
Now that I have covered the basic structure and exterior of your DIY chicken coop, let us move on to Step 6: Finishing the Interior of the Coop for Chickens.
The steps below are suggestions to keep the cost of building your own chicken coop down.
My chicken coop is made from premium materials.
All wood components are Cedar and the floor is not made of wood because wood absorbs water and fecal matter, causing the wood to rot, which provides an opportunity for bacteria to thrive.
My coop floors are hardware cloth which permits my chicken excrement and water to fall through to the ground below.
Note the excrement on the ramp, made of wood.
The interior is a vital part of your coop plans as it ensures your feathered friends have a safe, comfortable space. When building the interior, consider using smooth plywood for the walls to prevent injuries. Make sure to sand any rough edges to keep your chickens safe. For the floor, choose a material that is easy to clean, such as vinyl or linoleum, which makes it simple to maintain hygiene. Lay down bedding such as straw or wood shavings for added comfort. Partitions will help divide areas for nesting, feeding, and roosting.
Adding small chicken “furniture” such as perches and ramps within the coop makes the interior more engaging and functional. Customizing these elements with DIY plans ensures they fit the space perfectly.
You may want to include small nesting boxes made from plywood to give your chickens a cozy place to lay eggs. Adding soft bedding into these boxes will make them even more inviting.
Proper ventilation in the interior is crucial. Drilling small holes in the walls will allow airflow without causing drafts. Make sure to cover these with mesh to keep predators out.
Lighting will also be vital in countries experiencing long, dark winters. A simple bulb will keep your flock happy and productive.
Finishing touches such as hooks for hanging feeders and waterers will keep the floor space clear and tidy. By finishing the interior thoughtfully, you will ensure that your DIY chicken coop provides a safe, comfortable environment. Whether you have a small chicken coop or a larger setup, these steps guarantee your chickens thrive in their new home.
Recommendations for a Safe and Small Chicken Tractor
To ensure that your family’s backyard chickens are well-protected and happy, a safe and small chicken tractor is an excellent solution.
A chicken tractor, also known as a movable coop or portable coop, is an easy-to-build structure that provides chickens with shelter while allowing them to forage in different areas of your yard. These mobile coops are particularly advantageous if you are looking to rotate your chickens across different patches to balance pasture grazing and soil health.
A small chicken tractor should be lightweight yet sturdy enough to withstand weather conditions and potential predators. Start with a strong coop frame made from materials such as treated lumber or metal piping. Make sure that this portable coop has a secure locking mechanism for the doors and windows, ensuring it remains safe for your chickens even when it is moved around. Factor in proper ventilation to keep your chickens comfortable, and incorporate chicken wire or hardware cloth for added protection.
A vital feature of a small chicken tractor is its mobility. Equipped with wheels or skids, this movable coop lets you easily relocate it to fresh grass, providing a varied diet for your flock and minimizing the need for additional feed. Include handles or a lightweight design that makes it simple for even the younger members of your family to help with the moving process.
By thoughtfully considering these factors, you will create a safe and functional small chicken tractor that supports the health and well-being of your backyard chickens.
Check out my other posts on Backyard Chickens
Frequently Asked Questions (FAQs) on Building a Kid-Friendly Chicken Coop
Q: What are the key considerations when planning a kid-friendly chicken coop?
A: When planning a child-friendly chicken coop, it is essential to consider safety, accessibility, and engagement. Ensure the coop’s design includes secure perches, nesting boxes at a reachable height, and sturdy materials to protect both children and chickens. Proper ventilation, predator-proofing, and ergonomic features such as easy-to-open doors and windows also play a significant role to make the coop both functional and safe.
Q: What materials should I use to build a DIY chicken coop?
A: For a durable and safe chicken coop, use treated lumber for the frame, sturdy wire mesh for predator protection, and weather-resistant materials for the roof and walls. Smooth plywood to line the interior will prevent injuries. Consider also using vinyl or linoleum for the floor to facilitate easy cleaning.
Q: How much space should I allocate per chicken inside the coop and in the run area?
A: A general rule of thumb is to allow 2-3 square feet per chicken inside the coop and 8-10 square feet per chicken in the run area. This space ensures that your chickens have enough room to move around comfortably and maintain their well-being.
Q: How can I make sure the coop is easy for kids to interact with and maintain?
A: To make the coop child-friendly, install features such as lower-height perches, easy-to-open doors, and accessible nesting boxes. Include handles or lightweight designs in movable coops to make it easier for children to help with maintenance tasks such as moving the coop or gathering eggs. These ergonomic aspects make it safer and more enjoyable for children to participate in caring for the chickens.
Q: What are the essential features to include in a nesting box?
A: Nesting boxes should be approximately a foot square to accommodate one or two chickens comfortably and placed at a height that is easily reachable for egg collection. Ensure they are cozy, dimly-lit, and well-padded to provide a private and comfortable laying space for hens. Typically, one nesting box for every three to four hens is sufficient.
Q: How important is ventilation in a chicken coop, and how can I achieve it?
A: Ventilation is crucial to maintain a healthy environment in the chicken coop. It helps reduce moisture and ammonia levels, ensuring cleaner air. Install screened windows or vents on opposite sides of the coop to allow for good airflow. Place these openings high enough to prevent drafts directly on the chickens but low enough to be effective.
Q: What should I consider when building a portable chicken coop (tractor)?
A: A small chicken tractor should be lightweight yet sturdy, with a strong frame made of treated lumber or metal piping. Include wheels or skids for mobility and ensure proper ventilation with secure chicken wire or hardware cloth. Design it with easy-to-move handles to make it easier for children to help rotate the coop around the yard. This promotes varied foraging for the chickens and soil health.
Q: Are there specific rules or regulations I should be aware of before building a chicken coop?
A: Yes, always check local zoning laws and homeowner association rules before building a chicken coop. Some areas have specific regulations regarding the placement, size, and number of chickens you can keep. Ensuring compliance with these regulations will help avoid potential legal issues and ensure a smooth building process.
Q: How do I ensure the chicken coop is predator-proof?
A: Use sturdy materials such as heavy-duty wire mesh for windows and doors, ensure the coop’s frame is robust, and secure all openings. Add locks on doors and hinged windows to enhance security. Regularly inspect the coop for any weak spots or damage that could allow predators to enter.
Q: What type of flooring is best for the interior of a chicken coop?
A: The best flooring options for a chicken coop are vinyl or linoleum because they are easy to clean and maintain. Additionally, laying down bedding materials such as straw or wood shavings adds comfort for your chickens and helps absorb moisture and odors, keeping the coop hygienic.
Happy Backyard Chicken Keeping
Paying It Forward
Backyard Visitors is a participant in the Amazon Services LLC Associates Program, an affiliate advertising program designed to provide a means for sites to earn advertising fees by advertising and linking to Amazon.com. We also participate in other affiliate programs which compensate us for referring traffic.
